Junior Club Scout Clamp
TECH NOTE 33: Everything possible has been done to reduce the cost while still retaining the system's accuracy. The cost of the Junior Club Scout has been reduced from that of a Club Scout III by simplifying the electronics, using a lower cost electronics enclosure, eliminating the torque measurement feature and letting the clubmaker build the clamping system. The clamping system is the most labor-intensive part of the of the Club Scout III.
It is assumed the clubmaker has access to a drill press, circular saw and taps. The upper V block, an 1/4" thick angle iron top bracket and full thread 3/8x16 T handled carriage bolt are provided. The rest of the materials needed to build a clamping unit can be purchased and easily fabricated.
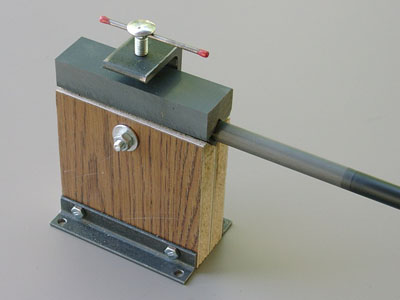
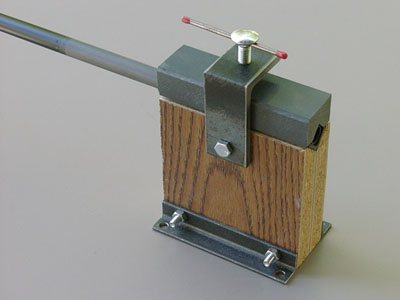
Here's a simple approach to building a clamping system, I'm sure there are others. The base should be about 1 1/2" thick about 5" high and exactly 5" deep. A clamping length of 5" has become pretty standard these days. I built a base using a 2x6 pine board. Although it worked it appears to be too soft. A couple of pieces of 3/4" oak or maple glued together would be better. I've found places that sell sink top cutouts for next to nothing. With the laminate to the outside this material works great. It's what I used for my sample. You'll also need a piece of 3/4"x1/8" angle iron cut into three five-inch lengths and appropriate length 1/4" (2) and 5/16" (1) bolts, nuts and washers. With a bench saw set at 45° cut a V grove into the top of the base to accept one of the 5" pieces of angle iron. The notch should be deep enough such that the angle iron is nearly flush with the top of the base. This becomes the lower V block. The shaft gets clamped by sandwiching it between the upper (supplied) and this lower V blocks. For the sample I built I used two pieces of 3/4" stock. I cut a 45° chamfer on each piece and glued them together to form the V notch. When you're sure everything is right epoxy the lower V block (one of the 5" pieces of angle iron) into the V notch you cut into the base. Be sure to deburr the edges. Burrs on this lower V block will cut into a graphite shaft.
The piece of 1/4" angle iron that's supplied is the bracket used in conjunction with the T bolt to apply the clamping force to the shaft. A hole will have to be drilled in the bottom of the long end of this angle iron piece so it can be bolted to the side of the base. Drill this hole and the matching hole in the wood base to allow the largest possible opening for the V block to allow the clamping of a gripped club. A 5/16" hole must also be drilled in the top of this piece. The hole should be centered over the top of the base. This hole is then threaded with a 3/8x16 tap. If you live in metric country and an American Standard tap is hard to find I'll tap drill and tap it for you.
The two remaining 5" pieces of angle iron are used as mounting feet, similar to the CSIII. The 1/4x20 bolts are used to bolt these pieces to the base. Four holes will have to be drilled in each of these pieces of angle iron. Two of the holes are used to hold them to the base and two to bolt them to your workbench. Be sure the holes use to attach to the base and those attaching the clamp to your work bench are staggered or you'll have a problem with the bolt heads interfering with one another. There are other approaches to fastening the base to your workbench but in any case it must be very solid. If the clamp or the work bench itself wobbles very much you will get a low frequency reading. A loose clamp can cause a few cpm error in frequency.
The 3/8" clamping T bolt may with time chew up the plastic upper V block. It wouldn't hurt to put a thin metal disc on the top of the V block to stop it from getting galled. The metal knockouts from electrical boxes work nicely. Epoxy it in place or recess it with a Forstner bit.
The pictures below should make the design of the clamping system a bit more lucid than my ramblings. It took me less than an hour to put the clamp together. Of course I have a pretty complete shop. Hopefully this'll be a fun project for you. Customers have not reported any serious difficulty in building the clamp.